MY DAY · STEP BY STEP
My Day 0.4.12 help
Installation, updates and everyday features: habits, notes, focus sessions, project time and appearance. Choose a section and follow one step at a time.

Using My Day 0.4.12
From one small step to a habit worth keeping. These short guides explain the everyday parts of your diary.
Real product screens with sample data. The screenshot language may differ; use the corresponding controls in your selected app language. Never pay or activate using details shown in screenshots.
Cloud copies and versionsHow to plan study and record completed sessionsPlan a personal project with tasks, notes and datesSave and restore a local diary backupReview your day and week from saved resultsCorrect a result and reopen your last completed day
See your progress. Keep your plans close.
Windows 0.4.12 brings clearer project statistics, event reminders, a personal vision board and more control over tasks.
Time, project by project
Choose an active project or an area of study and its subtypes. Read a properly scaled line chart; open archived work separately.
- Open Statistics and choose the period you want to review.
- Select a project or an area of study; narrow it to a subtype if needed.
- Review the time graph and the active projects receiving the most and least attention.
The overview highlights up to two projects with the most recorded time and up to three others with the least.
Remember the everyday things
Create events in Home, Payments and Meetings, or make your own categories. Set up to five notifications for one event.
- Open Reminders and choose or create a category.
- Add the event, date and time, then choose from one to five notification times.
- Keep My Day running and respond to the reminder inside the app.
Categories can be renamed, removed or added. Notifications appear inside the running app.
Keep your goals in sight
Add your own photos, wishes and next steps to a personal vision board. Changes save automatically; photos stay on your computer.
- Open Vision boards and create a board for your goals.
- Add your photos, a short note and the next step you want to take.
- Make a separate board backup with its photos before moving to another computer.
Vision-board photos are local and are not uploaded as part of diary cloud copies.
Let your projects change with you
Archive and restore individual tasks and subtasks, or delete a branch you no longer need. Recorded work time stays in your history.
- Open a project and find the task or subtask.
- Use Archive if you may return to it; restore it from the project's task archive.
- Use Delete for a branch you no longer need and review the confirmation, including its subtasks.
Archiving lets you return later. Deletion is a different action; completed time records are preserved.
Within reach on a smaller screen
Scroll the left menu to reach every section on a smaller screen. The Chrome panel also includes the fix for the window-layout error when minimizing the app.
Already use My Day? Install updates inside the app: Settings and backups → Updates.
Clocks, alarms and your ChatGPT
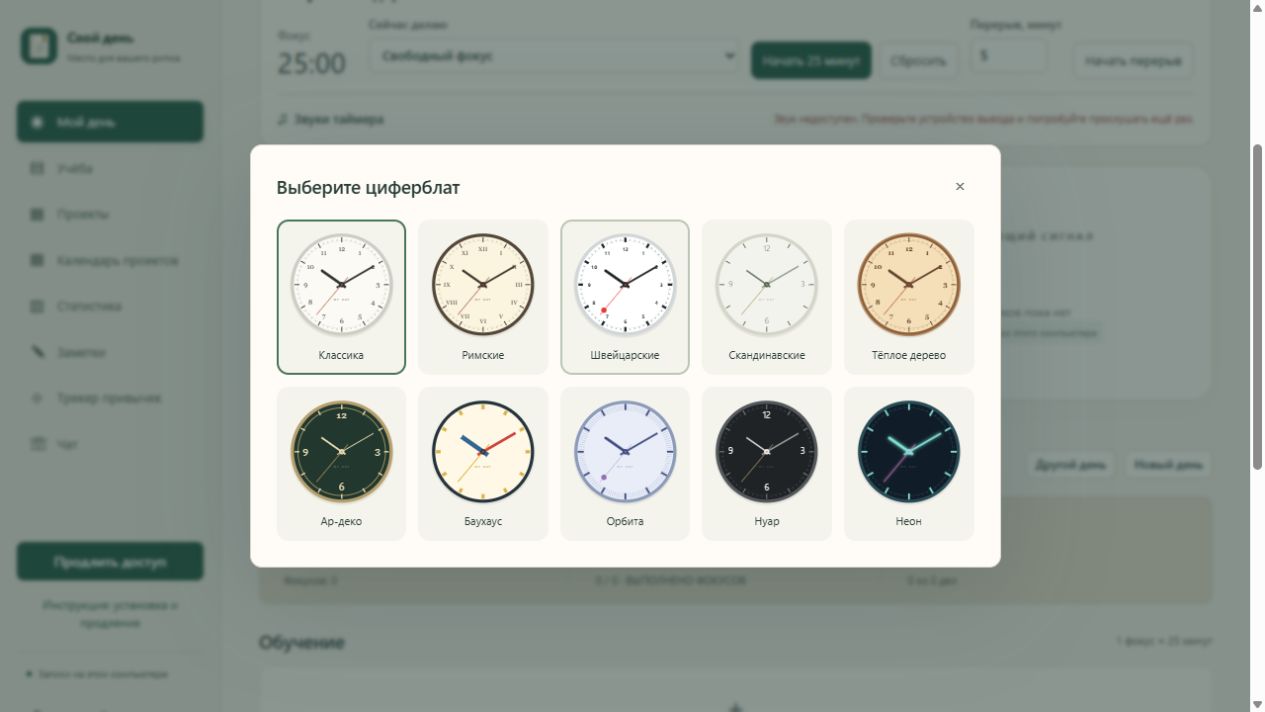
On My Day, select Clock style and choose one of ten faces. Time and date come from this computer. Your choice survives restarting the app.
An alarm for your day
Choose one of 16 built-in sounds for each alarm and listen before saving. Set a one-off or repeating alarm; snooze for another five minutes when you need them.
Alarms work while the app is running, including when minimized. A powered-off or sleeping computer cannot ring. After sleep, alarms up to 10 minutes late will ring.
Once · Every day · Weekdays · Weekends · Snooze 5 minutes · Start with Windows
Select Chrome at the top of the app. The installed Google Chrome opens on the right with its normal address bar and tabs; its home page is chatgpt.com. My Day uses a separate Chrome profile, so sign in once using your usual ChatGPT method. Your own account, plan and limits apply; no owner-funded API is used. Expand, hide or detach the panel into a normal window. Diary records are never sent to ChatGPT automatically. If Chrome is missing, the app offers to open Google's official website.
1. Install and activate
Keep your purchase page open
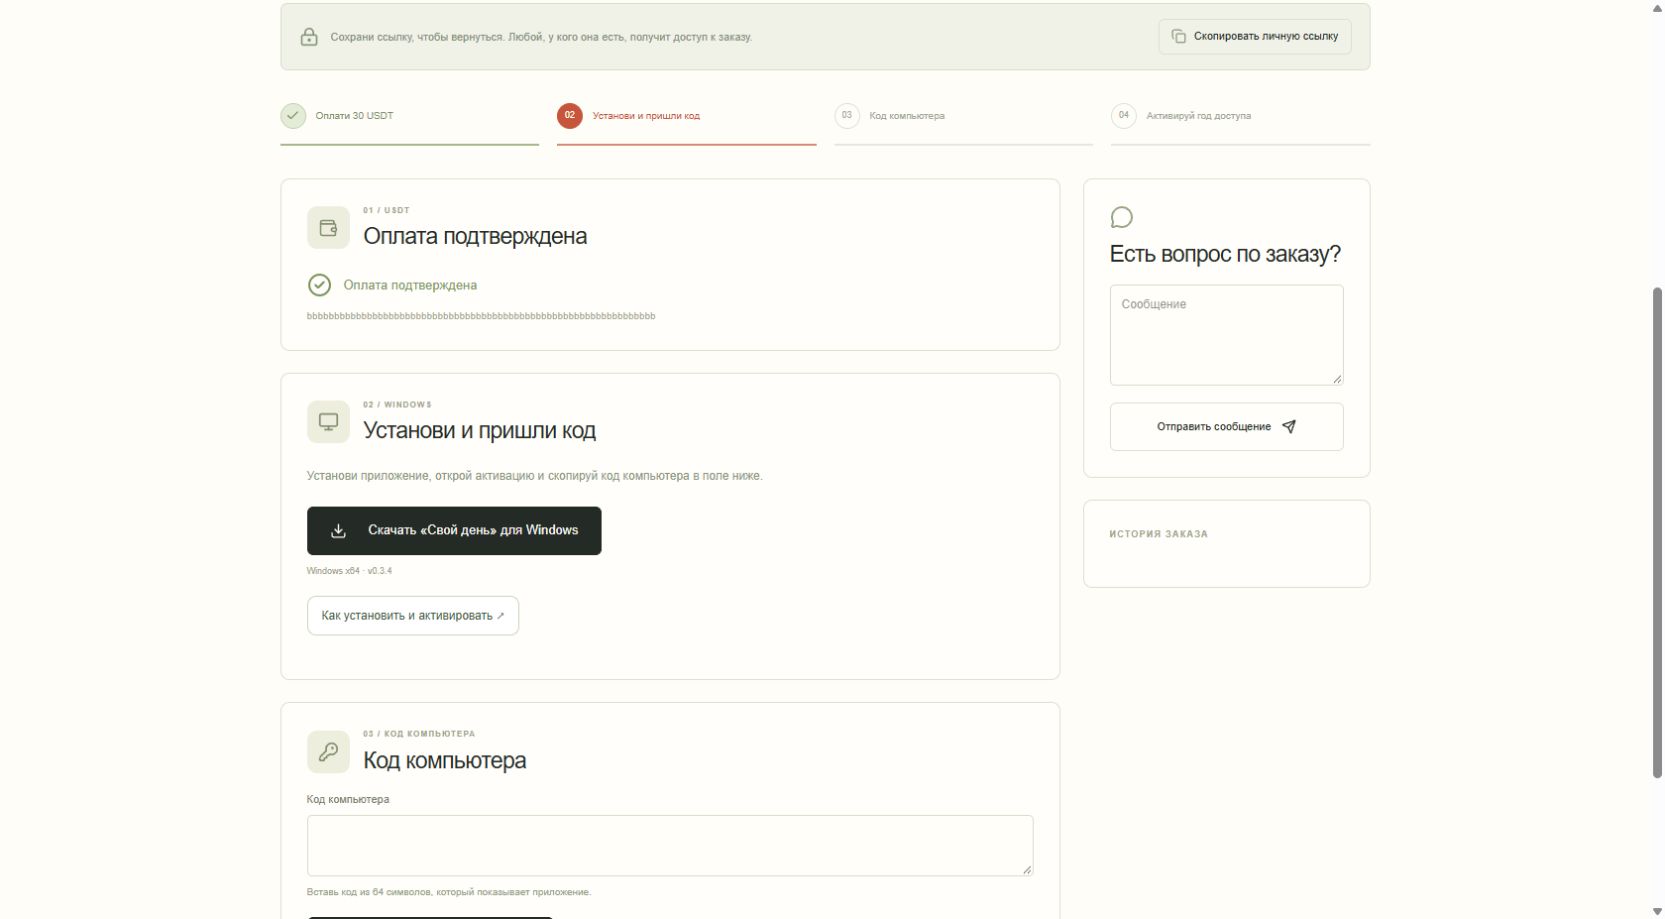
After submitting the purchase form, the website opens your private purchase page. Keep this tab until activation is complete. The service email also links to this page.
Wait for payment confirmation
Submitting a transaction ID does not confirm payment. The owner checks receipt. Wait for “Payment confirmed” and the Windows download button.
Download for Windows
Click the download button once. If asked where to save, choose Downloads and Save. Wait until MyDay-Setup-…-x64.exe finishes downloading.
Open the installer
Press Ctrl + J in your browser and open the MyDay download. Alternatively open File Explorer → Downloads and double-click the installer.
Complete the setup wizard
Choose your language, follow Next and Install, wait for completion, and launch My Day from the final screen. You can also search My Day in the Windows Start menu.
Recognise the app window
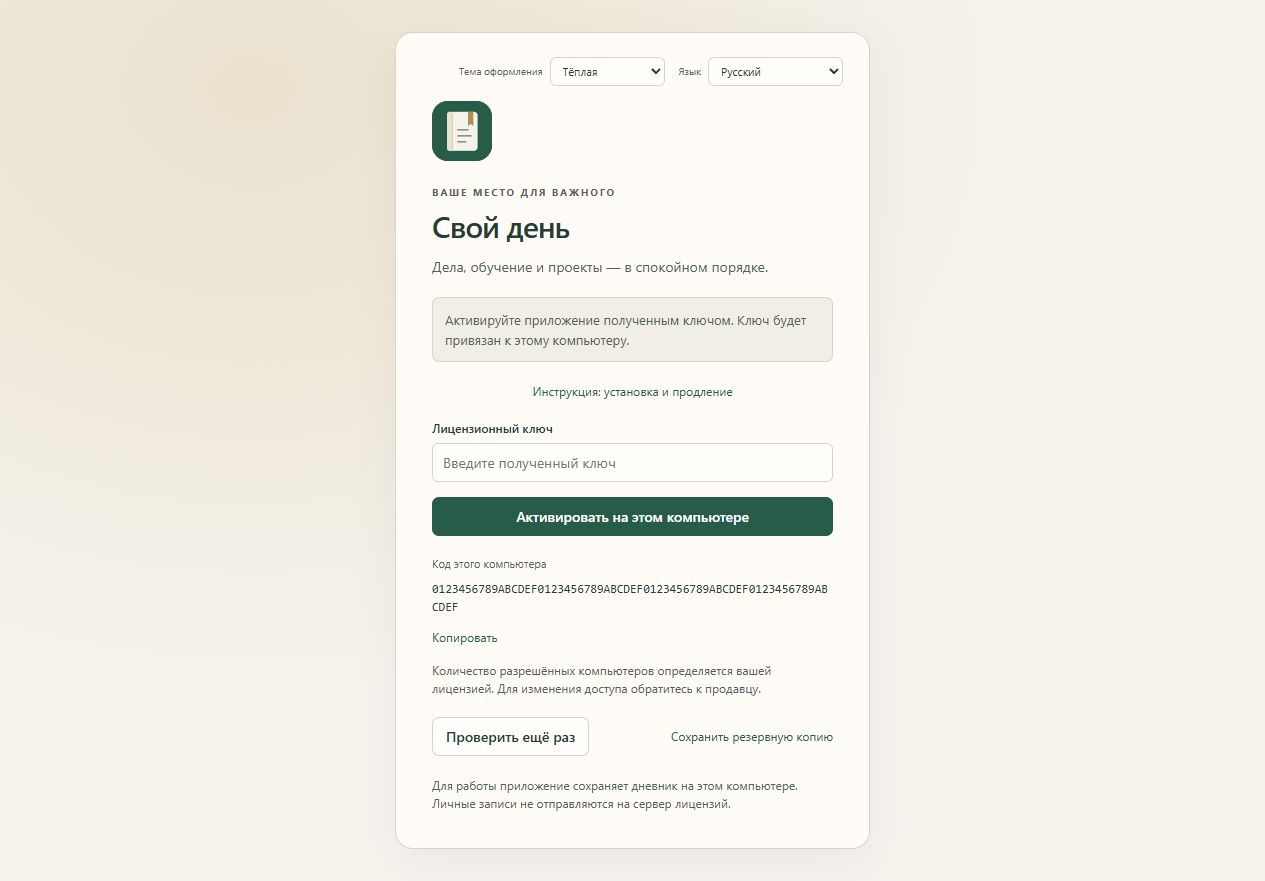
My Day opens in your regular browser at 127.0.0.1. This is the installed app on your own computer. The first screen has a licence key field and your computer code.
Copy the computer code
Click Copy beside the 64-character computer code. This device code is different from your licence key.
Return to your purchase tab
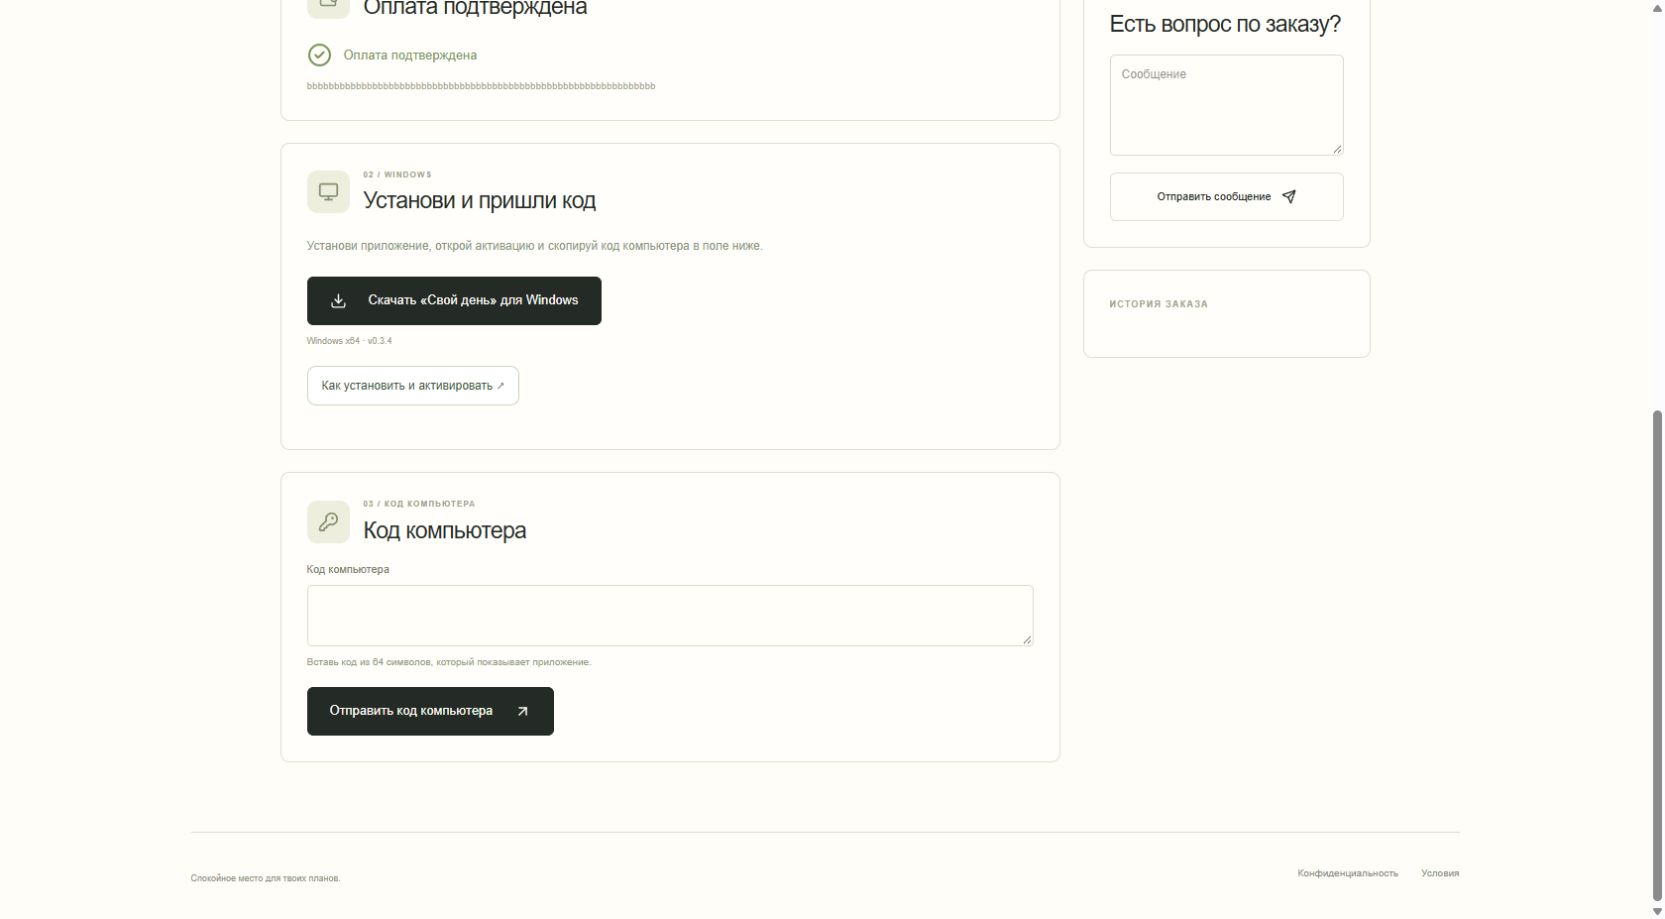
Select the studentwyckoffshop.app tab used for downloading. Paste into its Computer code field with Ctrl + V, then click Send computer code. Do not reply to the automated email with the code.
Wait for the licence key
The owner prepares your key. Your purchase page refreshes automatically and the service sends an email when ready.
Activate My Day
Copy the licence key from the purchase page. Return to the 127.0.0.1 app tab, paste it into Licence key and click Activate on this computer. My Day opens.
Launch next time from the shortcut
Use My Day in Start or your desktop shortcut. The saved key is reused; the helper opens the correct local address for you.
2. Renew access
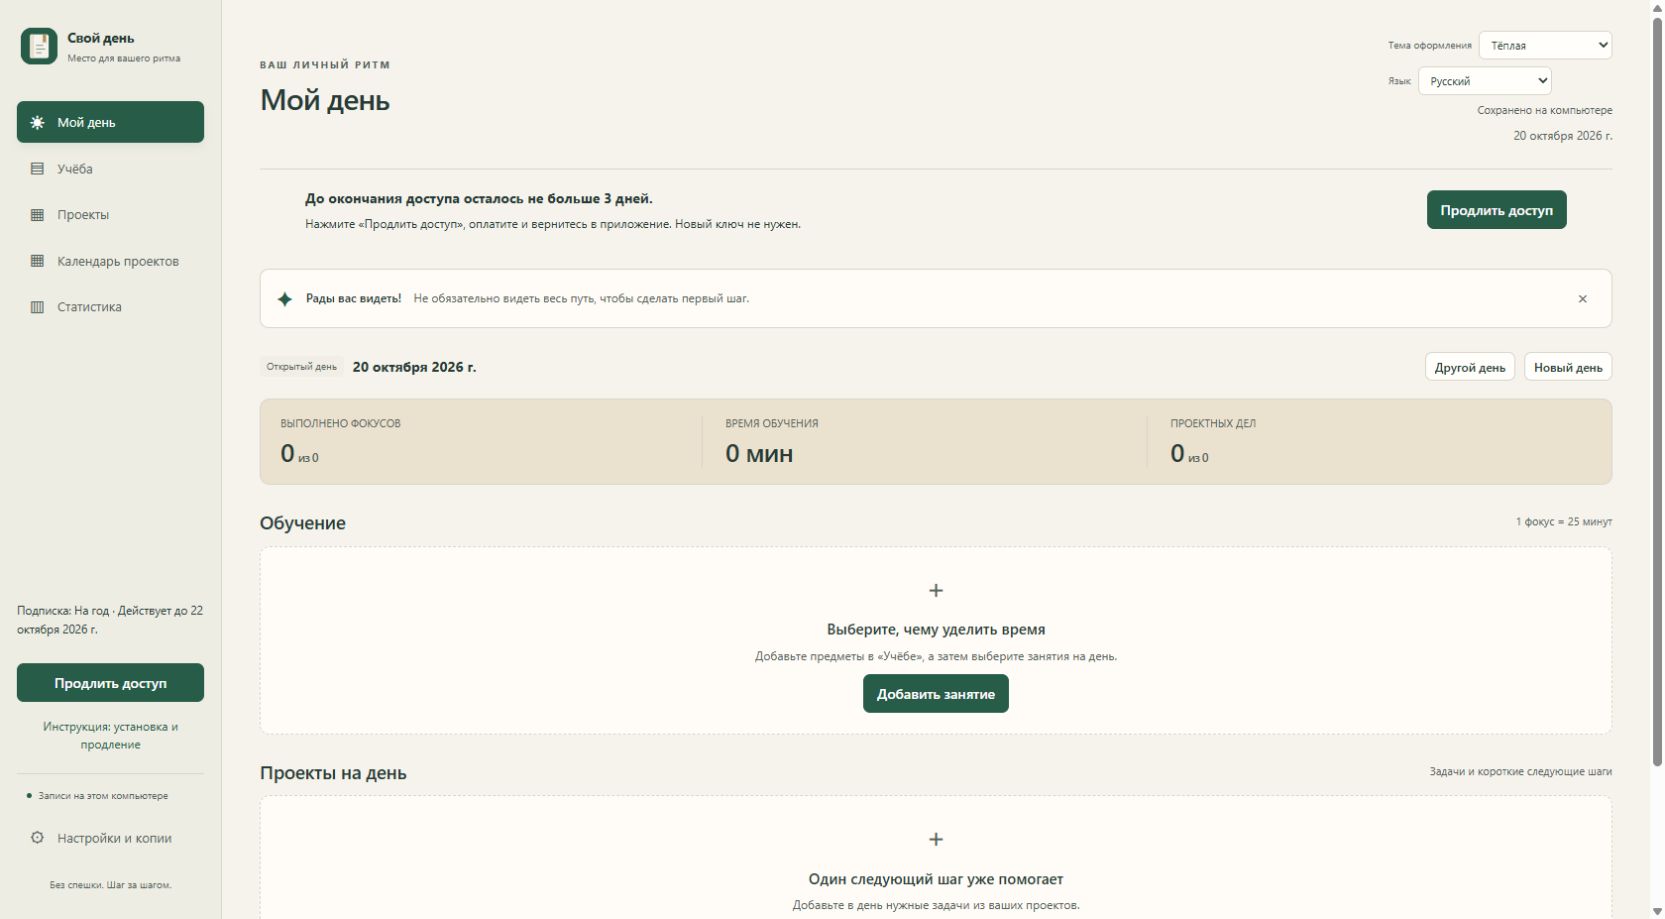
The renewal buttons and reminders below are available in version 0.3.4. If you use 0.3.1, first install the current release using the Update section below.
Launch My Day
Use its shortcut with an internet connection. You do not need to find an old email.
Click Renew access
The permanent button is in the left sidebar, in Settings and backups, and on the expired-access screen. It opens payment for your existing licence without re-entering your email, device code or key.
Check your renewal
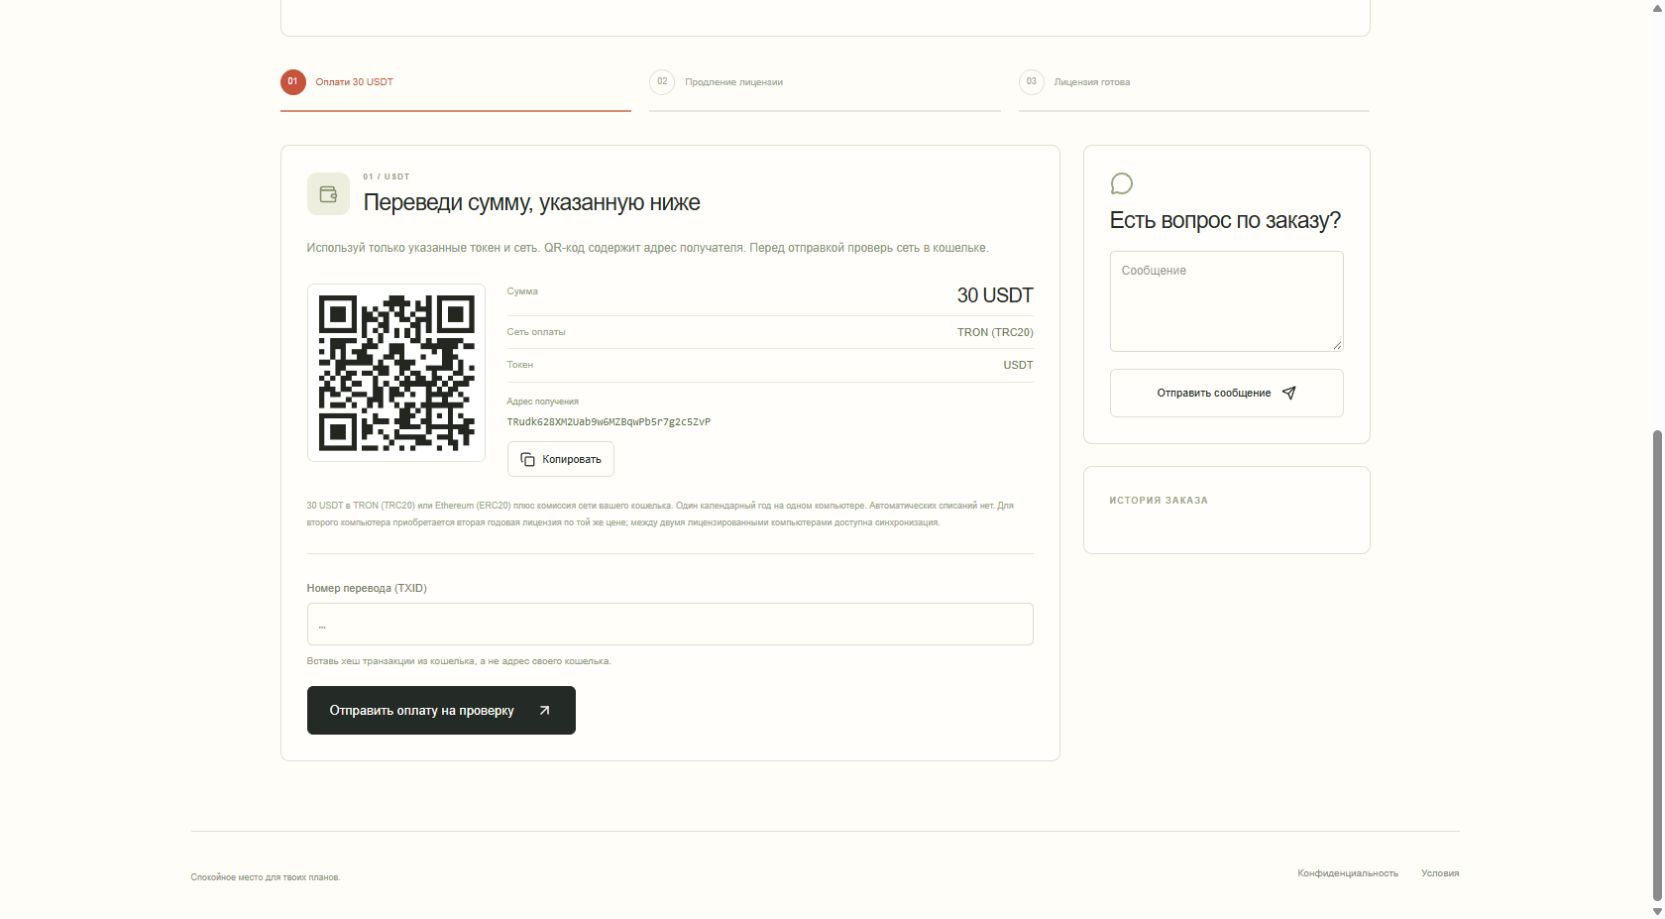
Confirm the page says Renewal. Check the amount and network. Repeated clicks reuse the existing unfinished renewal.
Pay using your current page
Use the address, amount and network shown on your private payment page. Confirm payment yourself in your wallet. No automatic debit occurs.
Submit the transaction ID
Copy TXID from your wallet into the transaction field and submit it. The status changes to payment review. Waiting is not a reason to pay again.
Wait for approval
The owner checks payment and completes renewal. Your page and the service email then show the new expiry date.
Return to My Day
The app checks the licence approximately once a minute. On the expired screen you can click Check again. The same key, computer, entries and settings remain. No reinstall or new computer code is needed.
Check the dates
Early renewal adds one calendar year to the paid-through date. After expiry it adds one calendar year from server time. In-app reminders appear 3 days and 1 day before expiry.
3. Update the app
Ordinary updates run inside the diary through Settings and backups. No website owner sign-in, new purchase, key transfer or second computer is required. Only historical version 0.3.1 needs a one-time installation of the current file from your private purchase page: save a backup and quit the app first. After that, use the built-in update steps below.
Open My Day online
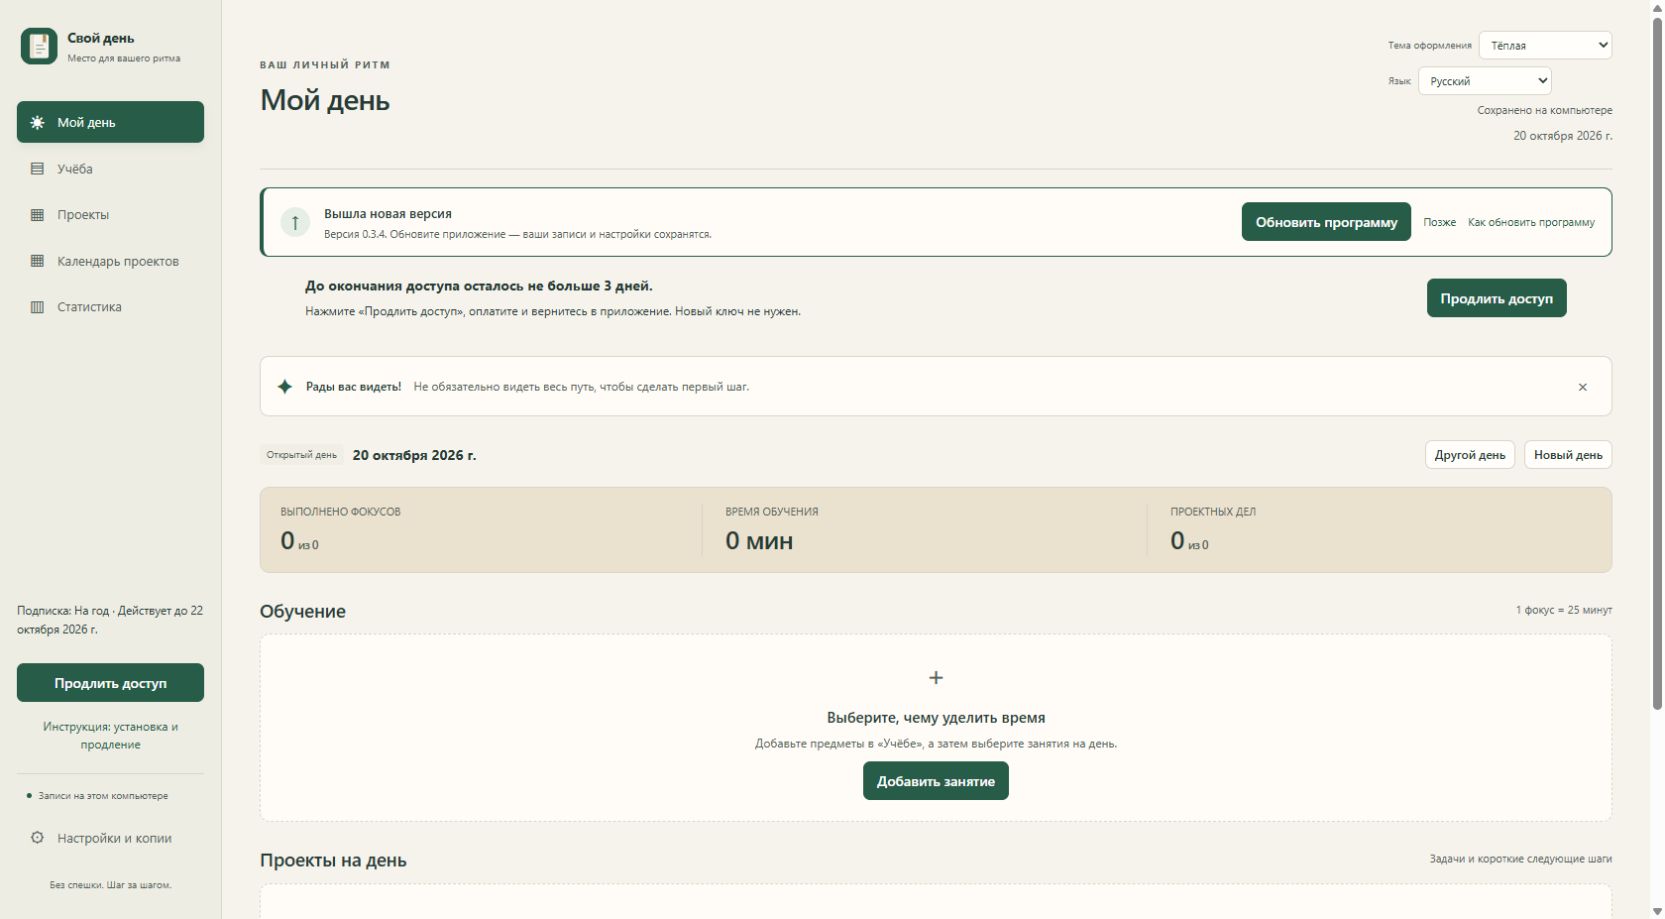
Connect to the internet and open Settings and backups → Check for updates. The app also checks at startup and periodically. An ordinary update does not require signing in to the website owner area or buying the app again.
Read the new-version notice
It shows the version, Update the app and Later. Later keeps the current version.
Save your work
Save open forms and staged results, then click Update the app. Installation does not start merely because a version is available.
Wait for the download
My Day downloads and verifies the installer, saves a recovery copy of the diary, and asks you to confirm starting the installer.
Confirm installation
Click Install update in the confirmation window. Cancel leaves the installer unopened.
Complete Windows setup
Keep the existing installation folder, finish the wizard and launch My Day. Do not delete the user data folder.
Verify the result
After restarting, open Settings and backups and confirm version 0.4.8. Check your previous entries and access expiry. An ordinary update does not require re-entering the key. Updating the app does not extend the licence term.
4. Cloud copies and versions
At home or on your laptop, you choose the saved version you want to continue with. There is a clear history, showing when and where each copy was sent.
Send your saved day
Finish and save your work, then select Send to cloud on the computer with the up-to-date diary.
Choose a version
On your other licensed computer, open the history and check the date, time and source computer.
Continue from that copy
Confirm loading the version you chose. Before replacing records, the app creates a local safety copy.
Automatic cloud copies can run every three hours when there are changes and the app is running online. Loading a version on another computer stays manual. Each computer needs its own licence.
Additional licence
Records are stored on this computer. Encrypted copies are sent to the cloud when you click Send or every 3 hours if automatic copies are enabled. Loading a chosen version is always manual.
One annual licence for one more computer, for 30 USDT. Each computer is renewed separately.
Up to three computers can share one diary. This purchase creates a separate order with a new key and its own diary.
The separate owner licence opens this guide. A checkout is created from the app activated through a regular purchase.
5. Troubleshooting
Download missing or app tab closed
Press Ctrl + J to find your browser download. Launch My Day again from Start or its shortcut if its tab was closed. Closing the tab does not delete entries.
How do I fully close the app?
Closing the browser tab leaves the installed helper running in the Windows notification area. To quit the app fully, first save any editor forms you want to keep, confirm pending day marks with Save results and save study-board changes with Save board. Find the My Day icon near the Windows clock, open the hidden-icons area if needed, open the icon’s menu and choose Close. Launch My Day from Start or its shortcut when you want to return. Saved records stay in your Windows profile; quitting is not a command to save pending changes. For an update started inside the app, follow its separate confirmation steps.
Renewal has not appeared
Check that the transaction ID was submitted and renewal approved. Return to the app online, wait for the next check or click Check again. Keep the same key. Use the question field on the payment page for help.
Update error or Windows warning
Check your connection and the download origin. Do not disable Windows protection. If a warning or error is unclear, stop and contact support with its text. A new computer or Windows reinstall requires an owner-approved device transfer.
How do I choose a dark diary theme?
In the installed My Day app, find Appearance in the header or on the access screen. Choose Dark and wait for “Theme saved”. White, Warm, Gray, Black, Night, Forest, Lavender and Ocean are also available. If “Could not save the theme.” appears, the app returns to the previous choice. Choosing a colour does not confirm editor forms, day marks or study-board changes; save those using their normal actions. The theme is an application preference and is not included in an exported diary JSON backup.
Support: studentwyckoff@gmail.com
6. Chat
Create a chat profile, find the other user’s exact @username and send a request. Once accepted, you can exchange text, HTTPS links and files up to 2 MiB. After closing a day, previous conversations remain in your personal history.
Create your profile and choose a @username.
Find the other person and send a chat request.
Once they accept, exchange messages and files.
Your chat profile (display name and photo), messages and files are stored by the service and accessible to participants and the service operator. Chat is not end-to-end encrypted. Your diary is not shared with the other person.
Habit tracker: small steps and new levels
Build a helpful habit or work towards leaving an unwanted one behind. A difficult step is a reason to continue, not to dismiss your progress.
Create a habit
Open Habit tracker, give the habit a clear name, choose building or quitting, and set a goal in successful days. Choose one check-in per day or two fixed halves of the local calendar day: 00:00–11:59 and 12:00–23:59. These are calendar periods, not a rolling 12-hour countdown.
Record each step in the calendar
Choose a date and mark a successful or difficult step. An empty check-in is not automatically successful. A difficult step breaks the current streak, while accumulated successful days remain.
Keep going after the first goal
Reaching a goal opens the next stage. Follow your level, stars and milestone badges: seven ranks and six badges support the journey, and levels can keep growing.
✓ The first goal starts another stage; it does not end the habit.
Notes: a separate home for your thoughts
Save text that does not belong to a project yet, and keep related notes together in groups.
Create and save a note
Open Notes, choose New note, select or create a group, enter your text and choose Save. Save the current note before opening another one.
Return to the right group
Choose a group and open a note to edit it. Use Save for changes and Delete note for a note you no longer need.
✓ This section accepts text; attachments and dictation are not available in the Notes sheet.
Focus timer, sounds and Windows notifications
A Pomodoro sets aside 25 minutes for study or a project task. The alarm reminds you to review the result; completion remains your decision.
Choose a task and start a focus
In My day, choose a study item or project task and start its focus timer. Check the current-task field and choose Start 25 minutes. A free focus session is available too.
Adjust your rhythm
Pause, resume or reset when needed. Set a separate break from 1 to 180 minutes and start it with its button. Breaks do not count as completed focus time.
Choose your sound and notification channel
In sound settings, choose separate focus and break sounds from 16 options. Set volume, mute, a 3/5/10/20/30-second duration or repeat until stopped. Preview lasts at most 5 seconds. Choose in-app notifications, Windows notifications or both.
Save the result after the alarm
You can minimise the diary: sound continues while the Windows app is running, including in the system tray. Return to My day, mark completed focus sessions manually and choose Save results. The timer never ticks tasks or records minutes for you.
An active alarm is not promised after quitting My Day completely or while the computer sleeps. Windows may hide banners when Do not disturb is on or notifications are disabled. Check Windows Settings → System → Notifications; you can also enable the in-app reminder.
Project time and useful statistics
Record time separately from finishing a task. Statistics reflect saved results, not how long the app stayed open.
Plan the task’s focus sessions
Add a project task to My day, expand it and plan 0 to 12 focus sessions. Each manually marked session represents 25 minutes. Save your results; completing the task is a separate action.
Compare a day with the bigger picture
Choose a period in Statistics to see study and project time by day, each project’s share and its all-time total. Expand tasks to understand where the saved focus sessions went.
✓ Older tasks without time records keep a Time not tracked label; the app does not invent minutes for them.
Themes, study cards and moving a task
Shape the workspace around your pace with nine themes, a clear study board and a place for tomorrow’s work.
Choose a theme and a study-card colour
In Settings and backups, choose one of nine themes. On the study board, keep a card’s automatic theme colour or select one of six manual colours. Colour changes appearance, not study results.
Move unfinished work to a date
In My day, choose Move for an unfinished study item or project task, then select the date. It appears in that day’s plan. You can change the date in the scheduled-transfer list.
fully close My Day from the Windows notification area
To quit My Day fully, use the menu of its icon near the Windows clock. Closing a browser tab alone does not quit the installed helper.
Save any open editor forms you want to keep. Confirm day marks with Save results and study-board changes with Save board.
Find the My Day icon near the Windows clock. Expand the hidden-icons area if it is not visible.
Open the menu of the My Day icon and choose Close.
Check that the My Day icon disappears. An old browser tab alone does not show whether the installed helper is running.
To continue, launch My Day from Start or its shortcut. Check your saved records; ordinary quitting does not itself require activation again.
What to check
Quitting is not a save command. Do not use it instead of confirming changes. If an in-app update is running, finish using the separate update instructions.